Entry forms are used to view and edit complex core business documents (Purchase Order, Sales Order, Sales Invoice, etc.) and entities (Customer, Supplier, Item, etc.). They display detailed information about one record at a time using a page-view layout. Many Zoom Links open an Entry Form to show the details when drilling in. Entry Forms also commonly include tabs to help organize the information and may include one or more "child" grids with lists of related records. For example, the Item Master Entry Form includes a Suppliers tab with a grid that shows information about each supplier that offers the item.
Entry forms are organized into sections as shown below:

The Title Bar is used to identify the form. The form icon and name appear on the left and the standard Windows Form controls (minimize, maximize and close) are on the right. You can drag the title bar with your mouse to move the form.
The main menu provides access to the controls for the form. The toolbar is an extension of the menu that offers quick access to commonly used menu options. Below is a map showing all of the options:
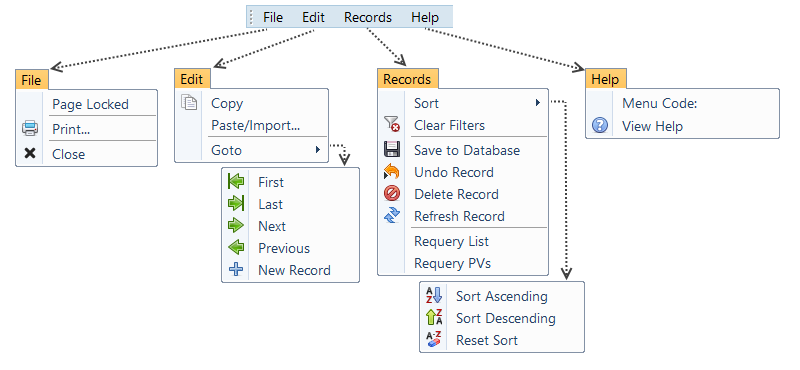
You can click on the following menu groups to show more information:
File
| Page Locked | Clicking this option will toggle the entry form between locked and unlocked mode. While locked no editing is permitted. Forms will automatically open unlocked if you have edit rights. A check will be displayed when the grid is locked. This option will only appear on editable forms. |
| Print... | Displays the print dialog for forms that have a primary report. This is the same as clicking the corresponding report option in the workflow bar. |
| Close | Closes the current form. If there are any unsaved changes then a dialog will appear asking if you would like to save before closing. |
Edit
| Copy | Copies the currently selected cells and rows to the Windows clipboard. | ||||||||||
| Paste/Import... | Pastes new rows from the Windows clipboard. The data must be copied to the Windows clipboard from Excel or Calc using the import templates provided with FOURA. This option is only currently available for a limited number of forms. | ||||||||||
| Goto |
Hover over this option to display the Goto sub-menu. Using any of these options will change the currently active record and reset the current selection. These options are also available on the Record Navigator in the Status Bar. The sub-menu options are:
Note: If you have made any changes to the currently active row then FOURA will attempt to save your changes before going to another row.
|
Records
| Sort |
Hover over this option to display the Sort sub-menu. Before sorting, make sure you have selected the field in the entry area that you want to sort by.
Tip: You can also sort by right-clicking on a field in the entry area and selecting a sort option from the context menu.
The sub-menu options are:
|
||||||
| Clear Filters | Clears any currently applied grid column filters. (Only for forms with no Filter Bar) | ||||||
| Save to Database | Saves any pending changes to the database. This option will only appear on editable forms. |
||||||
| Undo Record | Reverts any unsaved changes to the current record. If the current record is the Add placeholder then this will cancel the add, similar to pressing ESC. This option will only appear on editable forms. |
||||||
| Delete Record | Deletes the current record from the database. If the current record is the Add placeholder then this will cancel the add, similar to pressing ESC. This option will only appear on editable forms. |
||||||
| Refresh Record | Reloads the current record from the database. | ||||||
| Requery List | Reloads all records using the current filter. | ||||||
| Requery PVs | Updates any cached possible value lists to include any recent changes. This is the same as pressing the F9 Hot Key. |
Help
| Menu Code | Shows the menu code associated with the form. You can use this code on the main menu or to identify the form when contacting support. |
| View Help | Displays the context help topic for the form. |
The form header shows the form icon and name.
The Quick Filter for Entry Forms allows you to either select a pre-defined filter or to enter a document number to search for.
To use a pre-defined filter, click on the drop down arrow and select a filter from the list. The first matching record will be displayed. Use the navigation options in the Status Bar to view any additional matching records
To search for a document enter the document number and press enter. Many Entry Forms include additional advanced search capabilities - refer to the specific context help topic for each individual form for more information. If you prefix the document number with a colon ":", it will instruct the form to only search the primary document number and return one matching record.
For forms that support Attachments you will see an attachment button (  ) at the top of the form. Click this button to view or manage any attachments for the current document. If the document has any existing attachments then the icon will change to show a green check (
  ).
).
This bar contains the controls that move a document through it workflow, from creating a new document with the Add button to Closing or Cancelling the document at the end of its lifecycle.
Tip: See the Workflows topic for more information on how workflows are used in FOURA.
The specific workflow controls may be different for each type of document. Here are some of the common controls that you will see on many document types:
| Icon | Name | Description |
|---|---|---|
 |
Add | Create a new document. Most documents will start out as status "D", or Draft. |
 |
Validate | Check the document to make sure it is valid for release. This will appear on any document that includes a Release action. |
 |
Release | Releases a document, making it "official". Documents will always be validated prior to release. Releasing a document makes it permanent, so after release you can not longer delete the document, however; you can still cancel it. |
 |
Approve | Approves a document. This action will only appear for documents with an approval workflow. |
 |
Revise | Re-open a document for editing. This may not be possible, depending on how far the document has progressed in its workflow. If you are able to revise a document, then you must Release it again after making your changes. |
 |
Cancel | Cancel or delete a document. If the document is still a Draft (I.E. never released) then this will delete the document, otherwise it will cancel it. |
 |
Prints the document to a printer. For some documents this action may be recorded as part of the workflow, or may automatically add a PDF copy of the document to the attachments list. | |
 |
Emails the document to a designated list of recipients. Similar to Print, this action may be recorded as part of the workflow for certain documents. |
The entry area is where specific Input Controls are placed to display and edit the information in the document. This section will be different for each form. Please refer to the individual context help topics for form-specific information.
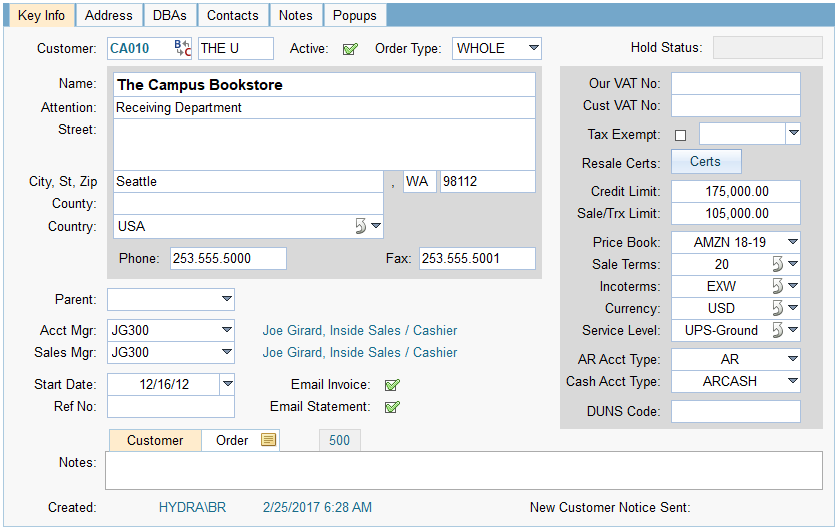
Here is a example showing the Entry Area for the Customers form.
The following context menu will appear when you right-click on any input control in the Entry Area:
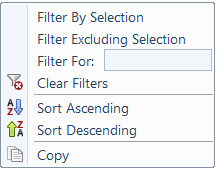
(In the list below, Context Field refers to the database field associated with the input control that you right-clicked)
| Option | Description |
|---|---|
| Filter By Selection | Adds a manual filter to only include records where the value of the context field matches the value displayed. |
| Filter Excluding Selection | Adds a manual filter to only include records where the value of the context field does NOT match the value displayed. |
| Filter For | Allows you to enter a manual filter for the context field using the standard Filter Syntax. |
| Clear Filters | Clears all manually added filters. This is the same as clicking the orange highlighted "Filtered" button in the Status Bar. |
| Sort Ascending | Sorts the records by the values in the context field in ascending order. |
| Sort Descending | Sorts the records by the values in the context field in descending order. |
| Copy | Copies the contents of the context field to the Windows clipboard. |
Many of the complex Entry Forms include tabs to help "stack" information. Tabs allow the same screen space to be used to display different data depending on which tab is selected. For example, the Entry Area on the Customers Form includes the following tabs:

These each display different data about the currently selected customer. Key Info shows the primary information, Address shows a list of shipping addresses, DBAs is a list of "Doing Business As" aliases, and so on.
Please see the individual context topics for details about the tabs on each Entry Form.
Child grids are grids that show a list of records with information that is related to the current Entry Form record. For example, on the Customers Entry Form, selecting the Contacts tab will show a list of contacts for the currently selected Customer.
Child grids are self-contained Input Controls, with each containing its own grid, toolbar, context menu, navigation controls and settings. Pending changes in any Child Grids are automatically saved when the associated "parent" document is saved.
Please see the Grids topic for more information on Child Grids.
The status bar displays status messages and provides navigation and search controls for the grid.

| Control | Description |
|---|---|
| First | Selects the first record. |
| Previous | Selects the previous record. |
| Record | Displays the currently active record and the total number of matching records for the current filter. Records are numbered from top to bottom starting with 1. You can click on this box and manually enter a record number. |
| Next | Selects the next record. If this button is clicked when you are on the last record add placeholder record will be displayed. If the form uses a popup add form then clicking this button while on the last record will do nothing. |
| Last | Selects the last record. |
| Filter Indicator |
If any filters are currently applied to the form then the filter indicator will light up as shown below:
You can click the filter indicator to clear all filters. |
| Status Message | Displays information about any running processes or actions. Messages will fade out after around 10 seconds. |
| Database Color Band | The band at the bottom edge of the status bar shows the color associated with the database. This band will appear on every form and is a helpful visual reminder of which database the form is showing data from. This can be especially important if you are running multiple instances of FOURA at the same time! |
The following hotkeys are supported for Entry Forms:
| Key | Name | Description |
|---|---|---|
| F1 | Help | Displays context sensitive help for the currently active form |
| F3 | Add Lead | Display the Add Sales Lead form |
| F4 | Filter Blank | Clears the form so that no records are displayed. Any pending changes will be saved first. |
| F7 | Query | Requery the current form. This is the same as selecting Requery List on the Records menu. |
| F9 | Requery PV | Requery all possible value (drop down) lists for the currently active form. This can be handy if you have a form open at the same time that the list is being changed by another user or by you in another window. Pressing the Requery PV key will update the lists on the current form without having to close and re-open it. |
| F11 | Main Menu | Displays the FOURA Navigator. |
| Esc | Escape | Undo changes for editable forms - you can press Esc multiple times to undo more. The first press will undo changes to the current field that is being edited. If you press Esc again then FOURA will undo changes to all other fields on the current record (similar to the Revert action). For popup dialog forms, the Esc key will cancel and close the dialog. |

