Browse Forms are used to search for documents and document lines, and to view tables with potentially large numbers of records, such as transaction histories. They display multiple rows at one time in a two-dimensional grid (like a spreadsheet) where each row represents one record and each column represents a Field or Attribute of that record. You can identify browse forms in the FOURA Navigator by looking for the word Browse in the form name.
Browse Forms are the primary information hubs in FOURA. They often include multiple Zoom Links that you can click on to instantly zoom to related information. You can individually customize these forms to change the column layout, format values, sort the results, group rows, and show summaries and totals. You can use customizable filters to limit the results to show just the cross-section of data that you need. Then, when you have everything the way you want, you can create a printout or you can export the data to Excel.
Most Browse Forms are read-only.
Browse forms are organized into sections as shown below:
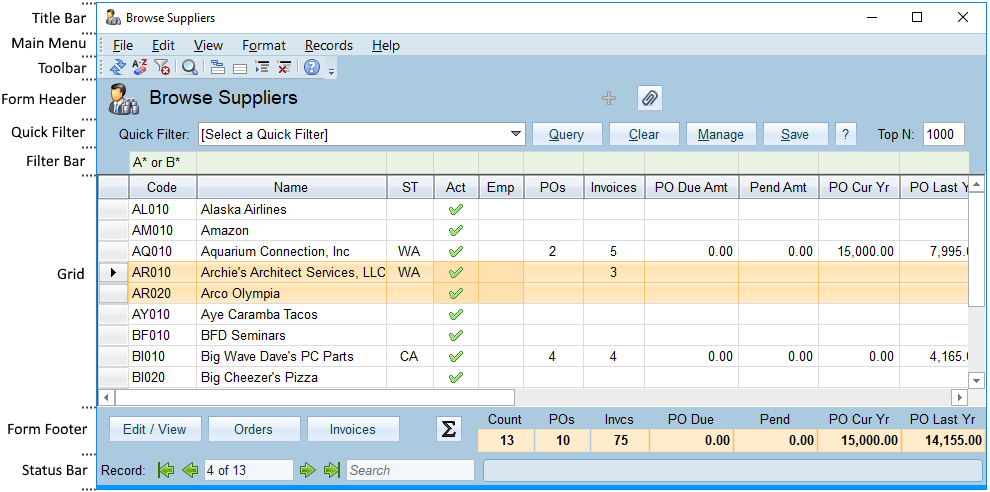
The Title Bar is used to identify the form. The form icon and name appear on the left and the standard Windows Form controls (minimize, maximize and close) are on the right. You can drag the title bar with your mouse to move the form.
The main menu provides the controls to use and customize the grid form. The toolbar is an extension of the menu that offers quick access to commonly used menu options. Below is a map showing all of the options:
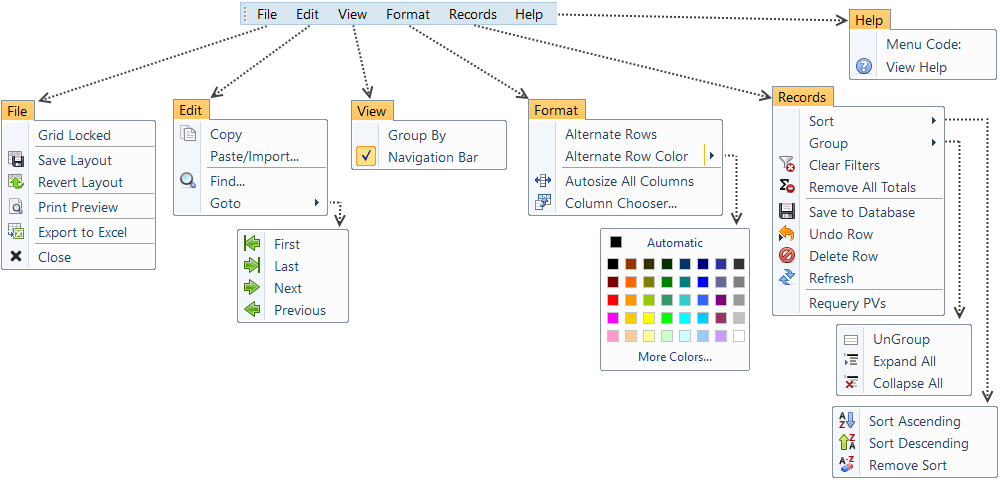
You can click on the following menu groups to show more information:
File
| Grid Locked | Clicking this option will toggle the grid between locked and unlocked mode. While locked no editing is permitted. Forms will automatically open unlocked if you have edit rights. A check will be displayed when the grid is locked. This option will only appear on editable forms. |
| Save Layout | Saves the current settings for the grid as a personal custom layout. Saved layouts will be automatically applied whenever you open the form. Layouts include column widths, captions, formats and visibility. |
| Revert Layout | Deletes the personal custom layout and restores the grid to its original settings. |
| Print Preview | Displays the print preview dialog where you can print the current records using the current grid layout. |
| Export to Excel | Exports the current records to Excel using the current grid layout. A file popup will appear where you can specify the Excel filename. |
| Close | Closes the current form. If there are any unsaved changes then a dialog will appear asking if you would like to save before closing. |
Edit
| Copy | Copies the currently selected cells and rows to the Windows clipboard. | ||||||||
| Paste/Import... | Pastes new rows from the Windows clipboard. The data must be copied to the Windows clipboard from Excel or Calc using the import templates provided with FOURA. This option is only currently available for a limited number of forms. | ||||||||
| Find... | Displays the Grid Find dialog where you can input search criteria to find matching values in the current selection or the entire grid. | ||||||||
| Goto |
Hover over this option to display the Goto sub-menu. Using any of these options will change the currently active record and reset the current selection. These options are also available on the Record Navigator in the Status Bar. The sub-menu options are:
Note: If you have made any changes to the currently active row then FOURA will attempt to save your changes before going to another row.
|
View
| Group By | Clicking this option will show or hide the grid group by area. A check will be displayed when the group by is visible. |
| Navigation Bar | Clicking this option will show or hide the navigation controls in the Status Bar. A check will be displayed when the navigation bar is visible. |
Format
| Alternate Rows | When checked the background color of alternate grid rows will be set to the specified Alternate Row Color. |
| Alternate Row Color | Hover over this option to show a color picker where you can set the background color to use for alternating rows. Lighter shades tend to work better. |
| Autosize All Columns |
Changes the width of all visible columns so that the widest content will fit.
Tip: You can manually autosize individual columns by double-clicking on the right-edge of the column header. You can manually set the width of a column by dragging the right-edge of the column header.
|
| Column Chooser... | Displays the Column Chooser popup which shows a list of all available columns and usage information. You can also use the Column Chooser to change the captions, visibility and value formats. |
Records
| Sort |
Hover over this option to display the Sort sub-menu. Before sorting, make sure that you have selected a cell in the column that you want to sort by.
Tip: You can also sort by clicking the header of the column you with to sort by. Clicking again will toggle the sort order between ascending and descending.
The sub-menu options are:
|
||||||
| Group |
Hover over this option to display the Group sub-menu. Grouping allows you to organize the rows into groups based on the unique values in the select column. The options in this sub-menu will only work if grouping is enabled. To find out more about grouping see the Grid section of this help topic.
The sub-menu options are:
|
| Clear Filters | Clears any currently applied grid column filters. (Only for forms with no Filter Bar) |
|
Remove All Totals |
Removes any totals that were added using the Show Totals Context Menu option. |
| Save to Database | Saves any pending changes to the database. This option will only appear on editable forms. |
| Undo Row | Reverts any unsaved changes to the current row. If the current row is the Add row then this will cancel the add, similar to pressing ESC. This option will only appear on editable forms. |
| Delete Row | Deletes the current row from the database. If the current row is the Add row then this will cancel the add, similar to pressing ESC. This option will only appear on editable forms. |
| Refresh | Reloads the grid from the database using the current filter. This is the same as pressing the Quick Filter Query button. |
| Requery PVs | Updates any cached possible value lists to include any recent changes. This is the same as pressing the F9 Hot Key. |
Help
| Menu Code | Shows the menu code associated with the form. You can use this code on the main menu or to identify the form when contacting support. |
| View Help | Displays the context help topic for the form. |
The form header shows the form icon and name and any custom actions that are enabled for the specific form. Custom actions commonly include attachment and workflow control buttons. Refer to the context help topic for each individual form for details about the custom actions supported.
The Quick Filter area provides an easy way to save, load and share filters for each form. You can use these filters to quickly view matching records. For example, you could create a quick filter for the Browse Invoices form to show any recently added invoices over 10,000 dollars.
To define new filters use the Filter Bar, or select a previously saved filter from the drop down list. When you select a saved filter the individual filter expressions will be displayed in the Filter Bar and the filter will be immediately applied to the Grid.
The Top N value is the maximum number of records that will be returned when you click Query. Increase this value if you need to return more records at one time, but keep in mind that larger values will require more memory. You can also set a default Top N value for all forms from the User Settings popup in the FOURA Navigator.
The filter bar is the green band located just above the grid column headers where you can enter your search criteria to limit which records are displayed. Each column has an individual filter. If you enter filters in more than one column then the results will only include rows where all the filter conditions are met.
There are two ways to enter filters:
To clear all filters click the Clear button in the Quick Filter.
The grid shows the actual data returned from the database as a searchable, customizable report. If the form is editable and you have the necessary permissions then you will be able to add, modify and delete data directly in the grid.
Grids have numerous capabilities for changing how data is displayed. Please refer to the Grids topic to learn more about these capabilities.
The Form Footer is the section located immediately below the Grid and above the Status Bar.
The footer is commonly used to show totals. Totals will include all filtered-in records (I.E. records that meet all entered filter conditions). If the footer includes a Sum button ( Σ ) then you can click it to re-calculate the totals.
The status bar displays status messages and provides navigation and search controls for the grid.

| Control | Description |
|---|---|
| First | Selects the first record in the grid. |
| Previous | Selects the previous record. |
| Record | Displays the currently active record and the total number of records in the grid. Records are numbered from top to bottom starting with 1. You can click on this box and manually enter a record number. |
| Next | Selects the next record. If this button is clicked when you are on the last row and the grid includes an add-row then the add-row will be selected. |
| Last | Selects the last record. |
| Search Box |
Use this box to search the grid for any text instantly as you type. For example, if you enter "i" then the first cell with an "i" will be selected. Then if you enter an "n" (making the search "in") the first cell with "in" will be selected, an so on.
Tip: While you are entering your search text, if you press Enter then the next match will be selected, and if you press Shift-Enter then the previous match will be selected. So to find the second occurrence of Paper, type Paper into the Search Box to show the first match and then press Enter to show the second match.
|
| Status Message | Displays information about any running processes or actions. Messages will fade out after around 10 seconds. |
| Database Color Band | The band at the bottom edge of the status bar shows the color associated with the database. This band will appear on every form and is a helpful visual reminder of which database the form is showing data from. This can be especially important if you are running multiple instances of FOURA at the same time! |
