In This Topic
 |
Menu Code: RET
Sales Invoice Return |
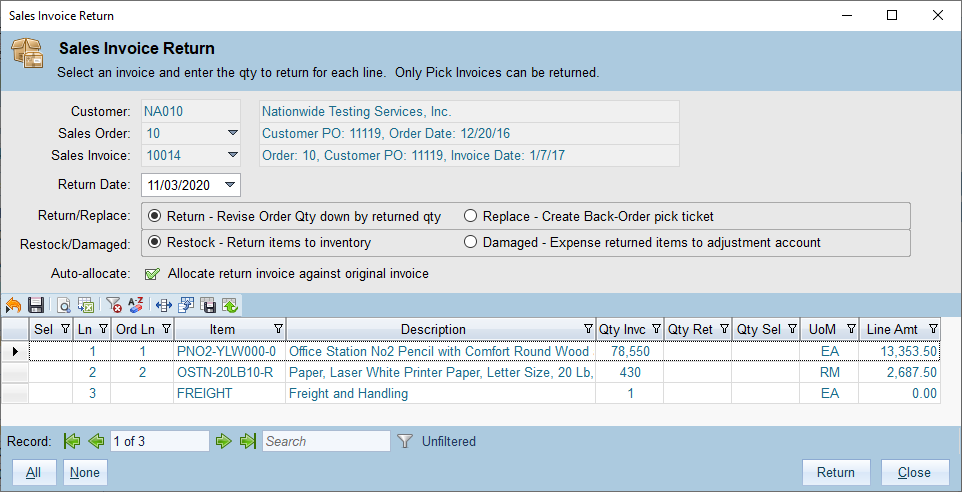
The Sales Invoice Return dialog is used to create returns against an existing invoice. The return process handles all aspects of the return, including creating the return/credit invoice, adding returned items back to inventory or expensing them, creating back-order pick tickets, revising the associated sales order, auto-allocating the return invoice against the original invoice and updating Avalara (if enabled).
Note: Sales Return invoices can only be added for Pick Ticket invoices.
Starting a Return

Normally you will start a return by clicking the "Return" button on the Sales Order Entry form or the Sales Invoice Entry form. When a return is started the Sales Invoice Return form will appear and the the Customer and Sales Order fields will be filled in. If you started a return from a Sales Order you will need to select a specific Pick Invoice, otherwise the Sales Invoice will be filled in as well. Once an original invoice has been selected then the list of lines will appear and you can specify return options and select individual lines to return.
Return Options
You can set the following options for a Sales Invoice Return:
- Return Date - this is the effective/document date of the return. This will be the document date used for the return invoice.
- Return - Selecting this option will return the selected lines and revise the associated quantity on the sales order down. The returned items will not be re-shipped. This option is mutually exclusive with the Replace option.
- Replace - Selecting "Replace" will return the selected lines and create a back-order pick ticket. Replacements will be re-shippped for the returned items.
- Restock -This option will restock the returned items back into inventory to the location they were originally issued from and at the same cost they were originally issued at. Before selecting this option, the items should be checked to make sure they are in saleable condition.
- Damaged - This indicates that the returned items are either damaged or non-saleable. The returned items will be expensed to the account and cost center specified in the Company accounts tab for the INV_RETX account type. If you attempt to use this option and the INV_RETX account is not specified then you will receive an error message.
- Auto-Allocate - When auto-allocate is selected then the return/credit invoice will be allocated against the original invoice. This can only be done if the original invoice has not already been paid. Otherwise leave this option unchecked and you will be able to allocate the return/credit invoice at a later time.
- Lines - You must select at least one line to return. To select a line click the Sel box on the left of a row. You can change the "Qty Sel" value if you only want to return some quantity on the line. The maximum that can be returned is the original quantity invoiced (Qty Invc) minus the quantity already/previously returned (Qty Ret).
Return Processing
Tip: Make sure you double-check your options BEFORE clicking return. The original invoice will not be revisable once a return invoice has been created. In addition, you will not be able to revise the return invoice if it has been allocated!
Click the "Return" button at the bottom right of the form to begin return processing. Before processing starts the return will be validated. If any validation issues are detected then processing will stop and a message will be displayed describing what needs to be fixed.
When processing is complete a message will be displayed showing which actions were performed. After you click OK on this message the return form will close and the new invoice will be shown in the Invoice Entry form.
Security
The following default roles can use this form:
| Role |
Allowed Actions |
| rl_AREntry |
View and Add |
| rl_ARManager |
View and Add |
See Also
Inventory
Order Management
Cash Management

